
A cheap water level monitoring system with ESP32 and Home Assistant
How to monitor your rain water tank level for less than 30€?

Requirements
You need a little bit of hardware:
- An ESP32 NodeMCU boar (I used the one from AZ Delivery)
- A waterproof ulatrasonic sentor (Used one from Amazon)
- A Micro USB cable
- A USB power supply (there are other options here)
I won’t cover home assistant installation in this post.
Introduction
It is very difficult to access my rain water tank. As I already had a home automation setup based on Loxone and Home Assistant, I wanted to integrate a level sensor. However, the official Loxone of is pretty expensive. Therefore, I decided to go for something more DYI.
ESPHome
First, you install ESPHome on your computer. ESPhome is a framework which produces ESP32 firmware based on yaml configuration files. The framework supports multiple devices and features. After flashing, the ESPHome devices can be integrated with Home Assistant.
Install ESPHome following these instructions. In a nutshell, open a terminal and type:
pip3 install esphome
esphome water.yaml wizard
Answer the questions like this:
(name [water_level]): water_sensor
(ESP32/ESP8266): ESP32
(board): nodemcu-32s
(ssid): <your_ssid>
(PSK): <your_wpa_key>
(password): <choose_a_pasword>
I highly recommend using python virtual environment and virtualenvwrapper (for convenience).
Connect the ESP32 to the laptop using a USB cable and type:
esphome water.yaml runFor the first run, select the option to flash over serial. If you entered correct information, the ESP32 should connect to your Wi-Fi network. Write down the IP address. If you have a DHCP server, it’s a good idea to create a static lease for your ESP32.
For subsequent runs, you can flash the device over the air using:
esphome water.yaml run --upload-port XX.XX.XX.XXThe sensor
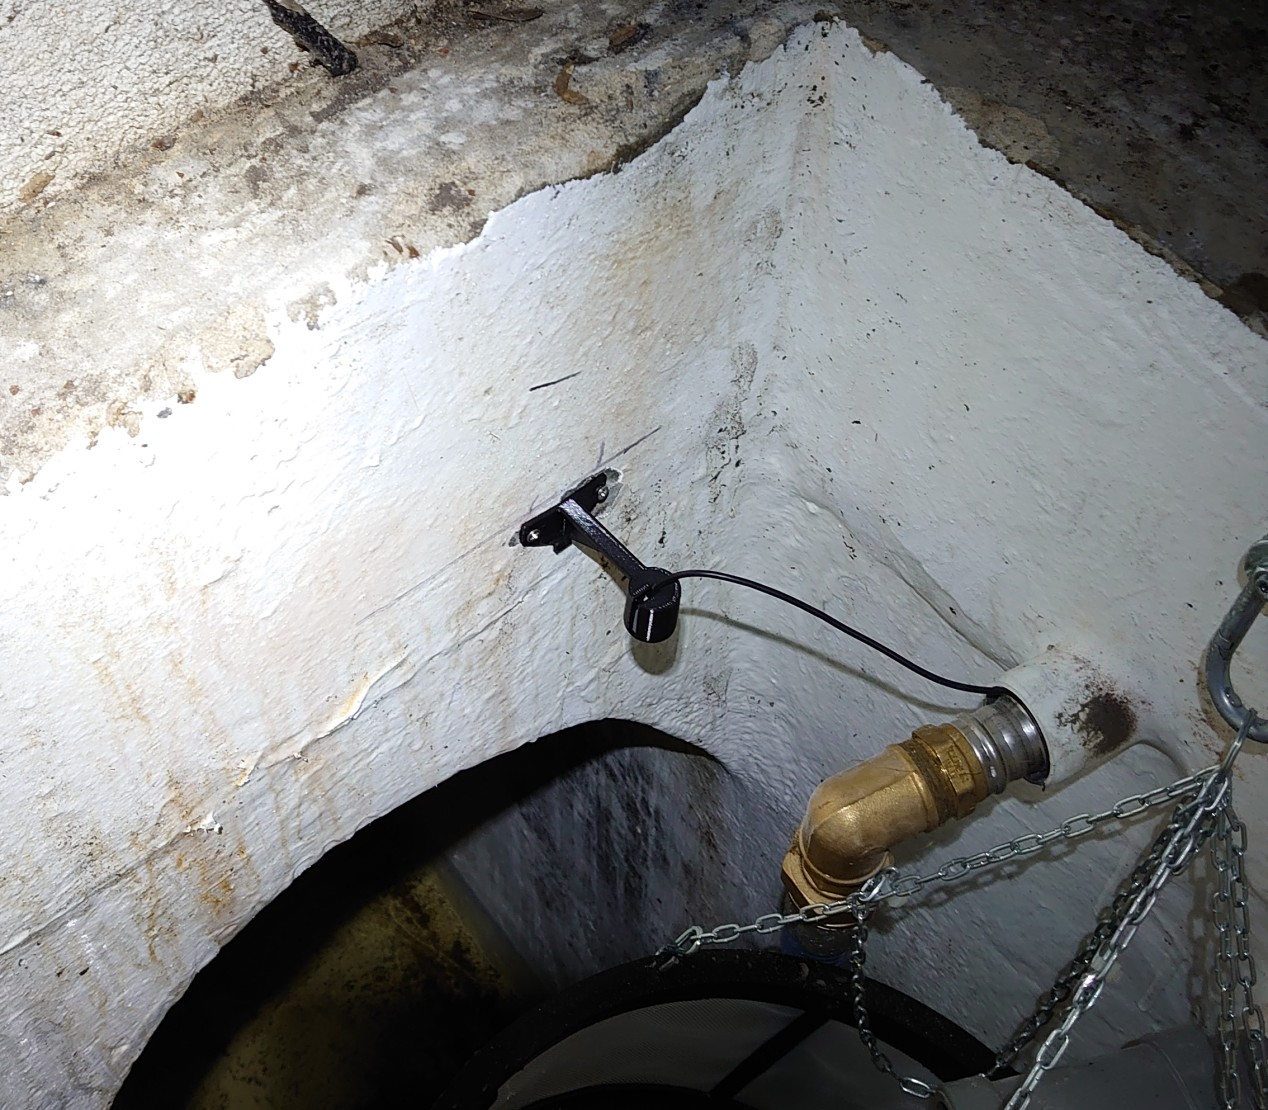
You can now connect the sensor to the board. The one from Amazon came with the necessary wires. I didn’t do any soldering yet. There are just 4 wires to connect and it works. SO I’ll keep it like that.
The sensor is pretty cheap and came with no documentation. After a few attempts, I realized that the TX pin should be connected to …echo and RX to Trigger. It does not make sense but it works. Connect RX go GPIO26 and TX to GPIO25. If it does not work, swap them.
Edit the water.yaml file and make it look like this one:
esphome:
  name: water_sensor
  platform: ESP32
  board: nodemcu-32s

wifi:
  ssid: <your_ssid>
  password: <your_wpa2_key>

  # Enable fallback hotspot (captive portal) in case wifi connection fails
  ap:
    ssid: "Water Sensor Fallback Hotspot"
    password: <auto_generated>

captive_portal:

# Enable logging
logger:

# Enable Home Assistant API
api:
  password: <complex_password>

ota:
  password: <complex_password>

sensor:
  - platform: ultrasonic
    trigger_pin: GPIO26
    echo_pin: GPIO25
    name: "Water Level"
    icon: "mdi:water"
    update_interval: 300s
    timeout: 3m
    filters:
    - filter_out: nan
    - lambda: return 1.64-x; # 1.64 is the distance between the sensor and the bottom of the tank
You can start by an update_interval of 1s for troubleshooting. Flash the device (over the air or serial). It is very important to place the sensor perpendicularly to the surface you are pointing. The sensor sends a sounds and measures the time for the echo. If it’s not perpendicular, you won’t get an echo. If it’s not “perpendicular enough”, the sensor will often timeout and the measurements won’t be reliable.
Point the sensor to a wall (perpendicular) and run the ESPhome. Got a value? Good, let’s continue.
It is possible to limit the impact of an improper angle. When the measure does not succeed, the ESP32 sends “nan”. Home Assistant will interpret it as “Unknown”. Unfortunately, there is no easy way to display the last known value in Home Assistant. It will just display an ugly “Unknown”. I added a filter to ensure that the ESPhome returns a measurement only if it’s not “nan”. It is this part of the config file:
- filter_out: nanThe 3D mount
Placing the sensor very precisely in the tank is not easy. Therefore I design 3D model of a sensor holder.
It works pretty well and it really improves the accuracy.
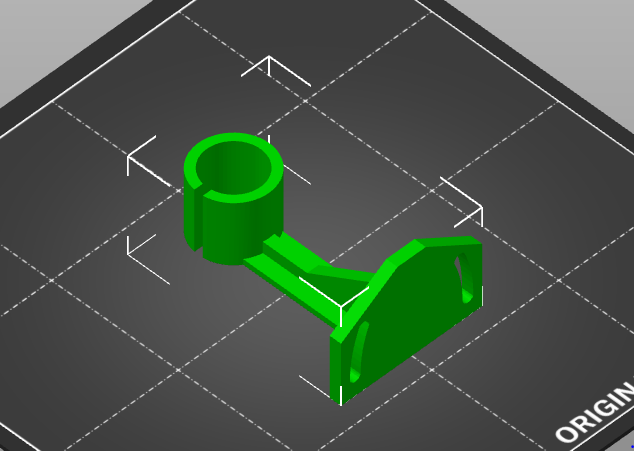
You can download the models here:
- STL file
- Prusa printer files I suggest using PETG for printing. PLA does not support very well humid environment.
Here is a picture of the device placed:
Home Assistant
Finally, go to your Home Assistant web interface and follow this guide to add the sensor to Home Assistant.
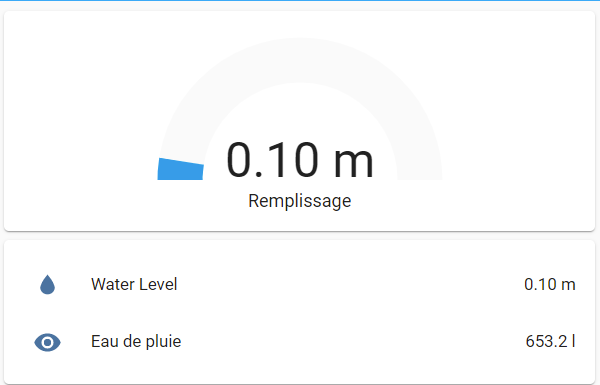
You should now have a water monitoring system, fully integrated with Home Assistant.
As a next step, I start working on a battery powered version with a Lora ESP32 for a water tank placed where there is no Wi-Fi or power. TBC…